How to Add a Loyalty Card to Your Apple Wallet: A Step-by-Step Guide
Welcome to our step-by-step guide on how to add a digital loyalty card to your Apple Wallet! If you're an Apple Wallet user, you already know the convenience it brings to your everyday life. From storing your credit cards and boarding passes to organizing your event tickets, Apple Wallet has become an essential tool. But did you know that you can also add your loyalty cards to Apple Wallet? That's right! No more carrying around a bulky wallet filled with plastic cards. In this guide, we will walk you through the process of adding a loyalty card to your Apple Wallet, ensuring that you never miss out on those valuable rewards and discounts again. So, let's get started and unlock the benefits of using Apple Wallet for your loyalty cards!
The Benefits of Using Wallet for Loyalty Cards
Wallet is a powerful tool that is part of Apple's strategy to eliminate physical wallets and keys. With the Wallet app, users can take advantage of various features and benefits that make managing their cards and information more convenient and secure.
One of the key features of Wallet is the ability to receive real-time shipping notifications for orders through the Apple Pay Order Tracking feature. This allows users to stay updated on the status of their purchases from participating merchants. Additionally, Apple has introduced a new buy now pay later service called Apple Pay Later, which provides users with additional flexibility in managing their finances.
Apple is also working on adding IDs to the Wallet app. Currently, two US states offer functionality for storing driver's licenses or state IDs in the Wallet app, with more states set to follow. This means that users can have their identification documents readily accessible on their iPhones, eliminating the need to carry physical cards.
Using Wallet can help reduce the number of physical cards you need to carry. Whether it's credit and debit cards, transit cards, event tickets, or loyalty cards, you can securely keep them all in the Wallet app. Adding cards to Wallet is easy - simply open the app, tap "Add to Wallet," and follow the instructions. You can also edit and organize your passes by opening Wallet, tapping "Edit Passes," and using features like scanning barcodes or taking pictures to add cards.
For those in Canada, Wallet offers a seamless and convenient way to store and access various cards. You can add loyalty cards and payment cards through Apple Pay, allowing for quick and secure transactions using your iPhone or Apple Watch. If you have old-style loyalty cards that are not compatible with Wallet, you can use third-party apps like Pass2U to digitize and add them to your Wallet.
Step 1: Opening the Wallet App and Adding Your Email
Step 1: Opening the Wallet App and Adding Your Email
To start using Apple Pay on your Mac, you'll need to set it up by adding your credit card, debit card, or other supported cards to your Wallet. This will allow you to make payments on websites that support Apple Pay.
If you already have a card associated with your iTunes Store or App Store account, adding it to your Wallet is easy. Simply verify the card's security code and it will be added to your Wallet.
To view a list of recent transactions for each card you add to your Wallet, you can simply open the app and navigate to the cards section. Please note that not all cards may support this feature.
To begin setting up Apple Pay on your Mac, follow these steps:
1. Open the Apple menu on your Mac and select System Settings.
2. In the System Settings menu, click on Wallet & Apple Pay, which can be found in the sidebar. You may need to scroll down to find it.
3. Once you're in the Wallet & Apple Pay settings, click on the "Add Card" button.
4. If you're not already signed in with your Apple ID, you'll be prompted to sign in before you can add a card.
5. Enter your payment information. If you have a card on file with Apple for making purchases from the iTunes Store or App Store, you can simply enter the security code when prompted. If you're adding a new card, you can either position it in front of your computer's camera or manually enter the card details.
6. Repeat the process for each card you want to use with Apple Pay.
It's important to note that if you sign out of your Apple ID account, you'll need to set up Apple Pay again and re-add any cards you had previously added.
Once you have set up Apple Pay on your Mac, you can make purchases on websites that support Apple Pay by simply clicking on the Apple Pay option at checkout. If you have multiple cards on file with Apple, you can choose which card to use for the purchase. You can complete the purchase by using Touch ID or by entering your password if you haven't set up Touch ID.
By following these steps, you'll be able to enjoy the convenience and security of using Apple Pay on your Mac for online purchases.
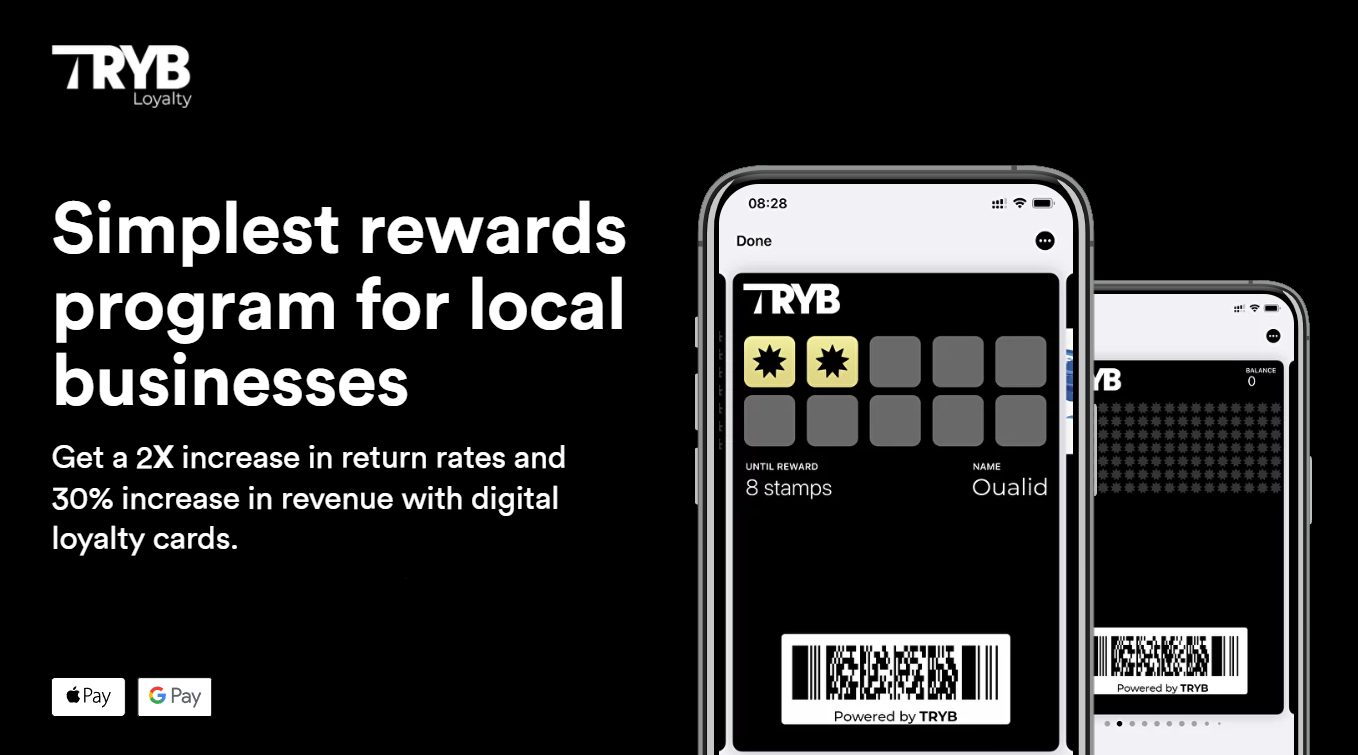
Step 2: Adding a Loyalty Card to Wallet
Now that you have enabled Wallet sync in your iCloud settings, you can easily add a digital loyalty card to Wallet. Wallet not only allows you to securely keep your credit and debit cards for Apple Pay, but it also provides a convenient way to store and access your loyalty cards, coupons, and rewards programs.
To add a loyalty card to Wallet, simply follow these quick and easy steps:
1. Open the app or email that contains your loyalty card or coupon.
2. Look for a notification or a prompt that says "Add to Wallet" or something similar.
3. Tap on the "Add to Wallet" button or follow the provided instructions.
4. If prompted, open Wallet on your iPhone.
5. Tap on "Edit Passes" or a similar option to manage your cards.
6. Tap on "Scan Code" or "Add to Wallet" to add your loyalty card.
7. If necessary, take a picture of the bar code on your loyalty card or scan the QR code.
8. Tap on "Add" to add the loyalty card to Wallet.
In some cases, certain loyalty cards may require the use of a third-party app like Pass2U. If this is the case, you can download the Pass2U app from the App Store and follow their instructions to add the digital card to Wallet.
With your loyalty card added to Wallet, you can now enjoy the convenience of having all your cards and coupons in one place. No more digging through your wallet or purse to find the right card when you need it. Wallet makes it easy to access and use your loyalty cards whenever you make a purchase.
So why not take advantage of Wallet and start adding your loyalty cards today? With just a few simple steps, you can streamline your shopping experience and enjoy the benefits of easy access to your favorite brands' rewards programs.
Step 3: Using the Pass2U App for Old-Style Loyalty Cards
Pass2U Wallet is a versatile app that provides Wallet users with a seamless way to collect and manage various types of passes, including loyalty cards, coupons, event tickets, and more.
One of the key features of Pass2U Wallet is its support for different types of barcodes, such as QR Code, Aztec, PDF417 2D barcodes, and Code 128 1D barcode. This allows users to easily scan or enter the barcodes on their cards or tickets to create passes in Pass2U Wallet.
Pass2U Wallet also offers a convenient lock screen feature that displays relevant passes based on the user's current location or time. This ensures that users always have quick access to the passes they need, whether it's a loyalty card for their favorite store or a ticket for an upcoming event.
Additionally, Pass2U Wallet supports iBeacon technology, which enables more personalized and context-aware notifications. With iBeacon, users can receive notifications when they are near a specific location or when certain conditions are met, making the app even more convenient and user-friendly.
For issuers, Pass2U Wallet provides a free Pass update API, making it easy to keep passes up to date. This ensures that users always have the latest information and offers available on their passes.
To transfer passes between devices, Pass2U Wallet offers Google Drive backup and restore functionality. Users can easily backup all of their passes to their Google Drive account on their old device and then restore them on their new device.
Pass2U Wallet is also compatible with Wear OS, providing additional convenience for pro users who have smartwatches. With Wear OS support, users can access their passes directly from their wearable device, making it even more convenient to access and use their passes on the go.
It's important to note that Pass2U Wallet requires certain permissions, such as access to identity, photos/media/files, camera, Wi-Fi connection information, and device ID. These permissions are necessary to provide the full functionality of the app and ensure a seamless user experience.
Lastly, for users who want to issue a lot of passes, Pass2U Wallet offers a simple solution. Users can visit the Pass2U website, design the desired pass, and then send it to their customers. This makes it easy to create and distribute passes for various purposes, such as membership cards, event tickets, and more.
Troubleshooting: What to Do if a Loyalty Card Doesn't Scan
If you're an Wallet user and your loyalty card doesn't scan, there are a few troubleshooting steps you can take to resolve the issue.
First, check the barcode or QR code on your loyalty card. Make sure it is clean and undamaged. If it's smudged or scratched, try cleaning it with a soft cloth or using a barcode scanner cleaning solution.
If the loyalty card still doesn't scan, try using a different scanning device or app. Sometimes, certain scanners or apps may have compatibility issues.
It's also important to ensure that you have the latest version of the app installed on your mobile device. Updating the app may resolve any technical issues that could be preventing the loyalty card from scanning.
If none of these solutions work, it's recommended to contact the customer support of the loyalty program or the retailer. They may be able to assist you with troubleshooting or provide alternative methods for earning or redeeming rewards.
In addition to troubleshooting, it's always a good idea to have a backup option for your loyalty card. This can include carrying a physical card or having a digital copy stored on your phone. Having a backup option ensures that you can still earn or redeem rewards even if the scanning feature is not working.
By following these troubleshooting steps and having a backup option, you can ensure a smooth and hassle-free experience when using your loyalty card with Wallet.
In Conclusion
Adding a digital loyalty card to your Wallet is a simple process that can save you time, space, and hassle. By following the steps outlined in this guide, you can easily access your loyalty cards with just a few taps on your iPhone. The benefits of using Wallet for loyalty cards are numerous, from eliminating the need for a physical card to conveniently storing and organizing all your rewards in one place. So, why wait? Start enjoying the convenience and rewards today by adding your loyalty cards to your Wallet. Happy shopping!